The Egghat is moving!!  

Posted by Hddvh

Hey folks,

it`s a while ago that you were able to fetch any news from here. And there`s a quiet simple reason for. Some weeks ago we scouted for 1-2 additional members for the egghat to be able to feed you with even more news. Out of this idea we`ve gathered 3 other people interested in this. Instead of simply adding them we deceided to start all oevr with a new blog.

Your profit? A semi-professional design, a bunch of tutorials, more news and everything else that sticks together with some more people on a blog!

You are invited to follow our further actions on the new blog:


It makes me a bit sad to leave the egghat behind me, so much efford invested to this one. But hey, it`s always going on, isn´t it?

So click here to see the new one. Make us happy by following us there.

Good bye ...

Your Egghats

Retreat? Hell, we just got here!  

Posted by SkelettetS in

The forgeworld Ogryn is done and submitted at CMoN, you can vote and comment here; http://www.coolminiornot.com/284065 . Aimed for a nightmarish feeling and i hope i pulled it of. its very dark but its the way i like it ;)

Plinth is from plinthcountry , which i can recommend. cheap fast shipping and great quality products.


Time went by fast - GD is coming closer! A short WIP report  

Posted by Hddvh in

It seems like the days went by really fast the closer the GD-Event is coming. Most of you will know that those days are full of preparataionwork and final touches. Maybe a last, really fast project to get another entry. And maybe days full of stress just because you re not in time with your latest project. That`s what happened to me. But I try to keep it cool. It`s my first GD ever and my entry should be a mini which I could be proud of. so no rushing, no half painted places or a bad basework.

Today I want to share my current progress on my ork sqwadron commander. There`s not much what happened, but I am satisfied with the result so far. Not every area is finished there, so don`t worry about bad blendings right now (walkie talkie arm; trouser...).


Before I started to paint on his left arm I tried a small freehand-tattoo. Nothing spectacular, but nice for a first try since shadows and highlights would cover it later anyway. I ll add a similar freehand later when everything on his arm is done, but not in white. Instead I would use a dark red to not pull attention to his arm.


Ogryn update  

Posted by SkelettetS in

So the Ogryn is with exception of some little details done! i can say, painting this miniature has not made me love forgeworld particulary, it had soooooo many flaws i had to correct that halted the painting progress. grrrr. next one forgeworld ogryn ill paint in the future will be inspected with magnifyer before i start the brushwork!

Time to start airbrushing the base...


How to photograph your figures  

Posted by Hddvh in

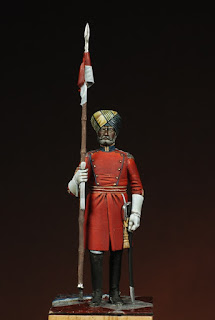
I ve found a really nice and well-written tutorial about how to get good pictures of your painted miniatures.

As I don`t have written this on my own I want to please you to take notice that this tutorial was written by Giovanni Azzara. You can find his blog here:

http://giovannimodelling.blogspot.com/


And here`s the tutorial, simply used copy and paste:

Dear all,

This is an article I was thinking of doing for quite sometime now.

Is a simple explanation on how to make great pictures of our models, without any special or (too) expensive asset.


Here is what we need:

A digital camera that must have the manual White Balance setting and maybe a macro lens/capability.

A tripod

2 table lamps, (you can use the one you work on your models)

2 smaller lamp

oven paper

background paper (A3/A2 coloured bristol paper are perfect)

a white sheet of paper

a room with all your lights off except the one above

Place the camera on the tripod.

Let's start with the camera settings: try to use the higher stop from f.18 to higher, let the camera decide the exposure time, with your tripod it won't be a problem.

Now, check the user manual of your camera and check how to measure and set up manually the White Balance.

The concept is that different bulbs or environment have different light temperatures, where human eye can understand and judge the white under different lights sources for the digital camera is not the same. White balance (WB) is the process of removing unrealistic colour casts, so that objects which appear white in person are rendered white in your photo. I've found a better explanation here: http://www.cambridgeincolour.com/tutorials/white-balance.htm

Usually, you need to go in your settings menu, look for White Balance>manual settings; switch on the lights you will use to take the pictures, place the white piece of paper under the lights and take a picture of it while in the WB menu, the camera will elaborate and your white balance should be now set. Anyway, check your camera user manual.

Trust me, this step will improve your pictures dramatically!

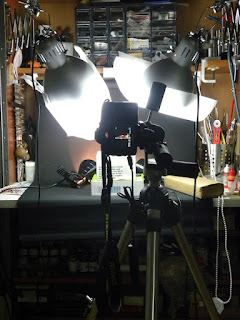
Ok, let’s set up the stage:

Place the A3/A2 bristol paper of the colour you like (avoid to use the same colour of the subject i.e. if the uniform is red, avoid a red background..) try to make a soft bend when rest on the table, something like the drawing below (Sorry I’m not Leonardo…)


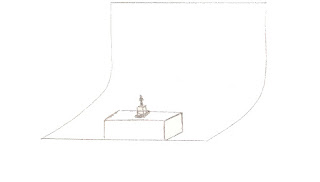
Place a box/stand where you are going to place your figure at least 30cm from the background. This box stand should be as high as the 2 small lamps you are going to use, better if taller.


Now the set up of the lights:

As a general notes, I use very cheap ikea lamps, I haven’t spent more that 40 euros for all the 4 lamps. I use, for the main lamps, 30W energy efficient bulbs with 6400k light temperature (they are equivalent of 100/150W incandescent lamp), normal 25w lights for the small lamps.

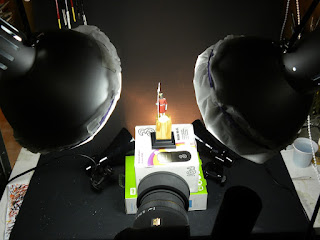
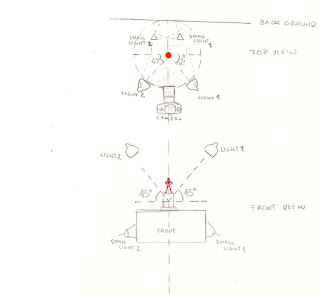
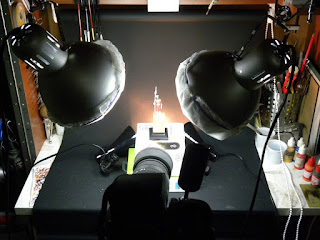
Place the 2 table lamps, 45° in front of the figure and at 45° angles from the top of the figure, again the following drawing should explain better.


Also place one or two piece of the oven paper in front of the lamps, to soften the light.

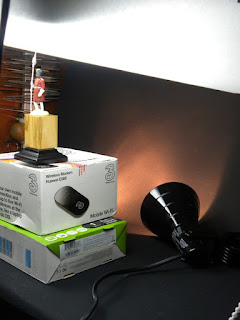
Now place the 2 small lights on the back of the stand resting on the table and pointing towards the background, they should light the bottom part of the background and give a gradient tone to it.


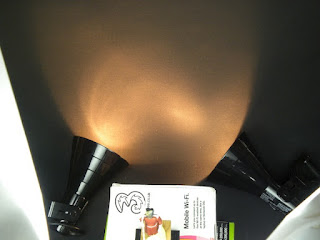
The gradient tone is a nice touch, look at the following picture, bare in mind that the backgroud is a piece of black cloth, see how nice id the gradient effect with the small lamps on.


That’s it, place the camera in front of the subject, choose a stop above f.18 and shoot; because the exposure time will be long, better if you use a remote control to shoot, if you don’t have one, no worries, just use the self timer.


You can adjust the exposure compensation value, if you notice that the picture is too dark or to light, usually I adjust mine to -1.3 but you need to check with your camera/lens/lights.

Take as many pictures as you can, every time take notes of stop, exposure etc.etc and check which one is better, if yur camera allow it, save these settings so you can reuse it in the future.


I hope this article make sense and will help you with your photography.

Being brave and let the colors flow  

Posted by Hddvh in

A friend of mine told me once to be brave while painting miniatures. The reason for was my own way of painting with very diluted color while adding glaces to shade or highlight anything. Sure, tehre are several ways of painting this or taht, but if you re using veeeeeery diluted paint you need a lot of time and patience to see results. My intention was to get smooth blendings. But it took some time.

On my ork I swear to myself that I am going to be more brave, using thicker colors all over to safe some time which I could use to practice some new techniques.

Enough words are spoken, let me show you my colorful progress on the Squadron Commander:


Limited Forgeworld Ork Sqwadron Commander - Preparation  

Posted by Hddvh in

Another day - another mini.

Since I`ve realised that I am not able to finish my planned project until German Games Day 2011 I deceided to start with a smaller one.

Stefan send me some minis as a birthdaypresent back in April. Beside some orknobz and other nice minis there was a very special miniature. It`s the limited Ork Aqwadron Commander from ForgeWorld. Such a cool mini! So I am going to paint this single miniatue as my entry for my first ever competition.


While removing all moldlines I was thinking about a small scene for the base. My big brain (maybe talking about a large amount of air in my head ;) told me to add a parachute behind the ork. So it will look like he just landed and is calling for reinforcement to smash pointy ears.

Before I am working directly on the abse some testing had to be done. Mixing some PVA glue with water to let a handkercheif drain full of it. This was simple put on a testing-surface to see how folds are going to be and how it dries later tio be ready for some pimping and painting.


"Ladiez an' gentlemen, please fasten ya seatbelts. We'z going to 'ave sum turbulences..."


Sadly it took 2 full days now and it`s still a little bit wet. But the result is nice so far. I hope it will get as hard as I imagine, otherwise it would be a challenge for me adding some patches & rough seams to the parachute.