I ve found a really nice and well-written tutorial about how to get good pictures of your painted miniatures.
As I don`t have written this on my own I want to please you to take notice that this tutorial was written by Giovanni Azzara. You can find his blog here:
http://giovannimodelling.blogspot.com/
And here`s the tutorial, simply used copy and paste:
Dear all,
This is an article I was thinking of doing for quite sometime now.
Is a simple explanation on how to make great pictures of our models, without any special or (too) expensive asset.

Here is what we need:
A digital camera that must have the manual White Balance setting and maybe a macro lens/capability.
A tripod
2 table lamps, (you can use the one you work on your models)
2 smaller lamp
oven paper
background paper (A3/A2 coloured bristol paper are perfect)
a white sheet of paper
a room with all your lights off except the one above
Place the camera on the tripod.
Let's start with the camera settings: try to use the higher stop from f.18 to higher, let the camera decide the exposure time, with your tripod it won't be a problem.
Now, check the user manual of your camera and check how to measure and set up manually the White Balance.
The concept is that different bulbs or environment have different light temperatures, where human eye can understand and judge the white under different lights sources for the digital camera is not the same. White balance (WB) is the process of removing unrealistic colour casts, so that objects which appear white in person are rendered white in your photo. I've found a better explanation here: http://www.cambridgeincolour.com/tutorials/white-balance.htm
Usually, you need to go in your settings menu, look for White Balance>manual settings; switch on the lights you will use to take the pictures, place the white piece of paper under the lights and take a picture of it while in the WB menu, the camera will elaborate and your white balance should be now set. Anyway, check your camera user manual.
Trust me, this step will improve your pictures dramatically!
Ok, let’s set up the stage:
Place the A3/A2 bristol paper of the colour you like (avoid to use the same colour of the subject i.e. if the uniform is red, avoid a red background..) try to make a soft bend when rest on the table, something like the drawing below (Sorry I’m not Leonardo…)

Place a box/stand where you are going to place your figure at least 30cm from the background. This box stand should be as high as the 2 small lamps you are going to use, better if taller.
Now the set up of the lights:
As a general notes, I use very cheap ikea lamps, I haven’t spent more that 40 euros for all the 4 lamps. I use, for the main lamps, 30W energy efficient bulbs with 6400k light temperature (they are equivalent of 100/150W incandescent lamp), normal 25w lights for the small lamps.
Place the 2 table lamps, 45° in front of the figure and at 45° angles from the top of the figure, again the following drawing should explain better.

Also place one or two piece of the oven paper in front of the lamps, to soften the light.
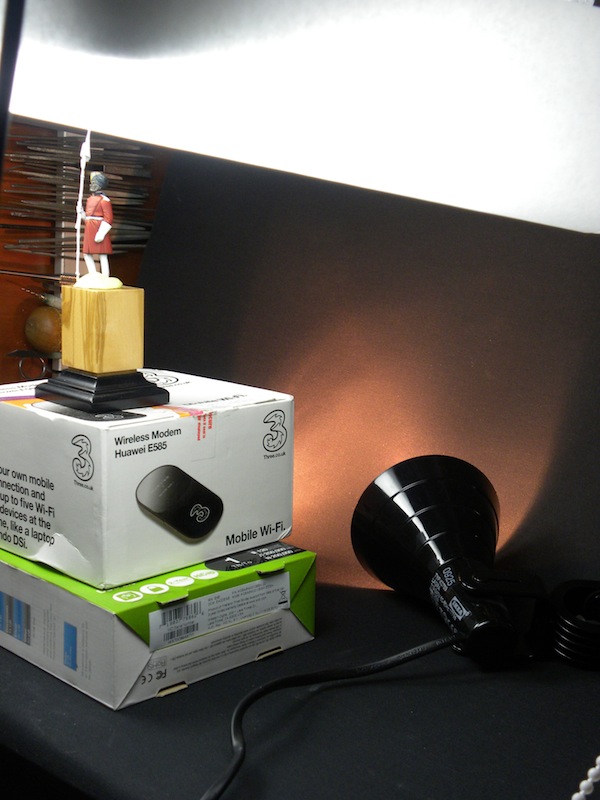
Now place the 2 small lights on the back of the stand resting on the table and pointing towards the background, they should light the bottom part of the background and give a gradient tone to it.

The gradient tone is a nice touch, look at the following picture, bare in mind that the backgroud is a piece of black cloth, see how nice id the gradient effect with the small lamps on.

That’s it, place the camera in front of the subject, choose a stop above f.18 and shoot; because the exposure time will be long, better if you use a remote control to shoot, if you don’t have one, no worries, just use the self timer.


You can adjust the exposure compensation value, if you notice that the picture is too dark or to light, usually I adjust mine to -1.3 but you need to check with your camera/lens/lights.
Take as many pictures as you can, every time take notes of stop, exposure etc.etc and check which one is better, if yur camera allow it, save these settings so you can reuse it in the future.

I hope this article make sense and will help you with your photography.
Here’s my tutorial about how to make battle damage out of masking fluid.
What you need:
*A bad ass battle hardened miniature. Or at least a miniature with details that are battle hardened. Or at least a miniature that got some beaten stuff at the base. Ah, you get the point!
*At least two paint pots with different colours obviously(although id prefer some more for shading/highlights…) to use with brush or airbrush.
*A cheap crappy brush you’ll never use again
*Masking fluid
Here is my damaged piece; an ork waaagh-banner that need some beating. Image shown below shows it with a basecoat of boltgun metal 100%.
 Added some Bestial brown, dark flesh, scaly green and black using a kind of rough feathering/glacing technique, every brushstroke hasn’t have to be perfect as most of it will be overpainted anyway. You don’t really have to make any shading at all at this stage at all, as both the main colour and the damaged areas can with advantage be shaded together instead. more important is that you get the highlight the way you want it before using the fluids, this is because the different types of area most certainly need different colours for highlight.
Added some Bestial brown, dark flesh, scaly green and black using a kind of rough feathering/glacing technique, every brushstroke hasn’t have to be perfect as most of it will be overpainted anyway. You don’t really have to make any shading at all at this stage at all, as both the main colour and the damaged areas can with advantage be shaded together instead. more important is that you get the highlight the way you want it before using the fluids, this is because the different types of area most certainly need different colours for highlight.
Masking fluid, i use W&N brand, cost about £3-4 and shoud be included in every orklovers home. mask the areas that are battledamaged. Just randomly dot it on chaotically and it will be fine.
use one old worn out or really cheapa$$ brush, the fluid ruins it in no time!
 After the fluid have dried, which shouldn’t take long – like a minute or so, repaint the banner. try to get a really thin layers of paint (or even better – use an airbrush..). Otherwise the masking will be very hard to remove.
 The masking is removed with a rubber or a "hard" brush and tweezers. try not to get too violent when removing it… it can be a little frustrating at times but I should be removed pretty easy if the above layer is thin. It can be nice though if you try to remember just about where you put the most liquid so you know “where to dig…”
 Full glory pic. i paint a really thin white line beneath the damaged areas to get a more "3d" effect of the damage. Also, some additional weathering will make it even better.
 Here's an image of the finished model with the banner, not the best photos but yeah...
http://www.coolminiornot.com/250103
Since Games Workshop is using resin to cast miniatures it s more important then ever before to know how to strip painted resinminiatures.
There are several ways to do so. Some fluids I ve tested worked, some not. And some destroyed the minis... :( So, let me tell you how I am stripping resinminis.
First of all i ll start with a list of things you need:
1. Orange Terpen from Schmincke (it s the worlds best brushcleaner!)
2. An old toothbrush
3. Some protecting glasses
4. Any kind of cup
5. A miniature you want to free from the paint

STEP 1
Fill a little bit of the Orange terpen in your cup and gently dip the brushes of your old toothbrush. Be careful and just dip the brushes into it, otherwise your toothbrush will look like this:

STEP 2
Now you can pick up your mini and brush all over it. You ll see how the paint is getting fluid immidiatly. Just brush all over until it s clean. You could use an old brush with a tough point to reach areas you can t reach with your toothbrush.
Make sure to protect your eyes from the sprinkles caused by brushing the mini. The Orange terpen is acid for your eyes!!

STEP 3
Finally you just have to wash your stripped mini with some soap and water. Now it s ready to be primed again :)
Before:

After:


Contributors

Subscribe To


Recommendet Shops


Blog - Newsticker
-
-
Do Not Miss 2025 Week 245 weeks ago
-
-
-
-
-
-
-
-


